4 Essential Steps for Painting a Room Like a Pro
Follow these 4 essential steps for painting a room like a pro. Achieve a flawless finish with expert guidance.

Follow these 4 essential steps for painting a room like a pro. Achieve a flawless finish with expert guidance.
4 Essential Steps for Painting a Room Like a Pro
Painting Prep Work The Foundation of a Flawless Finish
Alright, let's talk about painting a room. It sounds simple, right? Grab a brush, slap on some paint, and call it a day. But if you've ever tried that approach, you know the results can be… less than stellar. The secret to a truly professional-looking paint job isn't just in the painting itself, but in the meticulous preparation that happens before the first drop of paint even touches the wall. Think of it like baking a cake; you can have the best ingredients, but if you don't prep the pan or mix things correctly, it's not going to turn out well. This prep work is your foundation, and skipping it is like building a house on sand. It’s the difference between a quick fix that looks okay for a bit and a durable, beautiful finish that you’ll be proud of for years.
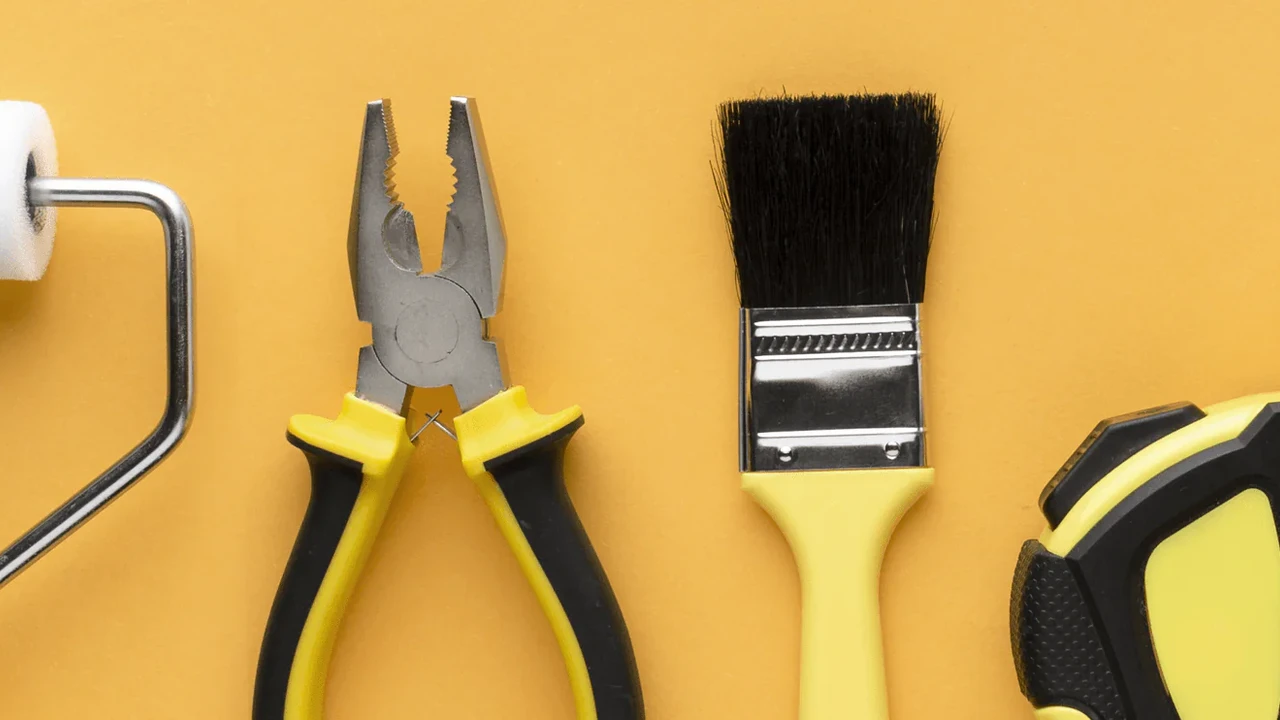
So, what does this crucial prep work involve? First up, clearing the room. This might seem obvious, but it’s often underestimated. You want to remove as much furniture as possible. If something is too big to move out, push it to the center of the room and cover it completely with plastic sheeting. Don't skimp on the plastic; paint splatters have a way of finding their way into the most unexpected places. Drop cloths are your best friend for protecting floors. While old sheets might seem like a good idea, they’re often too thin and paint can bleed through. Invest in good quality canvas or plastic drop cloths. They’re reusable and offer much better protection. For example, a 9x12 ft canvas drop cloth from brands like Trimaco or Warner can cost anywhere from $20 to $40, but it's a worthwhile investment.
Next, you need to clean the walls. Dust, grime, cobwebs, and even greasy fingerprints can prevent paint from adhering properly, leading to peeling or an uneven finish. A simple wipe-down with a damp cloth and a mild detergent (like a sugar soap solution) is usually sufficient. For tougher stains, a degreaser might be necessary. Make sure the walls are completely dry before moving on. This step is often overlooked, but it’s critical for paint adhesion.
Now, let's talk about repairs. This is where you address any imperfections on your walls. Small nail holes can be filled with spackle or lightweight joint compound. For larger holes or cracks, you might need to use a patching compound and possibly some drywall tape. Once the filler is dry, sand it smooth with fine-grit sandpaper (around 120-150 grit). You want the repaired area to be perfectly flush with the rest of the wall. Don't forget to wipe away any sanding dust. For example, a small tub of DAP DryDex Spackling Compound costs about $5-$10 and changes color when dry, making it easy to know when to sand.
Finally, taping. This is where precision comes in. Use high-quality painter's tape to mask off trim, baseboards, window frames, and door frames. Don't use regular masking tape; it often leaves a sticky residue or allows paint to bleed underneath. Brands like FrogTape or ScotchBlue are excellent choices. FrogTape's PaintBlock Technology is particularly good at preventing bleed-through. A roll of good painter's tape can cost $5-$10, but it saves you hours of tedious cleanup. Press the tape down firmly to ensure a tight seal. For outlets and switch plates, it's usually best to remove them entirely. Just remember to turn off the power at the breaker box first for safety!
Priming Perfection Why You Should Never Skip This Step
Okay, you've prepped the room, cleaned the walls, made your repairs, and taped everything off. You might be itching to grab that paint can, but hold on! There's one more crucial step before you start painting: priming. Many DIYers skip primer, thinking it's an unnecessary extra cost or step, especially if they're using a 'paint and primer in one' product. While those products have their place, a dedicated primer offers benefits that often outweigh the convenience of skipping it, especially in certain situations.
So, why prime? First and foremost, primer creates a uniform surface for your paint to adhere to. If you're painting over a dark color with a lighter one, primer is essential for blocking out the old color and preventing it from showing through. Without it, you might need three or four coats of paint to achieve full coverage, which means more time and more money spent on paint. Primer also helps to seal porous surfaces, like new drywall or patched areas, ensuring that your topcoat of paint goes on smoothly and evenly. If you paint directly onto unprimed drywall, the drywall will absorb the paint unevenly, leading to a splotchy finish.
Another key benefit of primer is its ability to block stains and odors. If you're painting over walls that have been exposed to smoke, water damage, or even pet odors, a good stain-blocking primer is non-negotiable. Products like Kilz or Zinsser B-I-N are specifically designed for this purpose. They create a barrier that prevents stains from bleeding through your new paint and locks in unpleasant smells. For example, Zinsser B-I-N Shellac-Base Primer is excellent for severe stains and odors, drying quickly but requiring good ventilation. A gallon typically costs $40-$60.
When should you definitely use a dedicated primer? Always use it on new drywall or bare wood. If you're making a significant color change (e.g., dark to light), primer is a must. If your walls are stained or have strong odors, a stain-blocking primer is essential. If you're painting over a glossy finish, a bonding primer will help the new paint stick without extensive sanding. Even if you're using a 'paint and primer in one,' consider a separate primer if any of these conditions apply. The 'primer' in those products is usually just a thicker paint, not a true primer with specialized adhesion or stain-blocking properties.
Applying primer is similar to applying paint. Use a roller for large areas and a brush for edges and corners. Aim for a thin, even coat. Let it dry completely according to the manufacturer's instructions before applying your first coat of paint. This usually takes a few hours. A good quality all-purpose primer, like Zinsser Bulls Eye 1-2-3 or Kilz 2 All-Purpose, costs around $20-$30 per gallon. Investing in primer now will save you headaches, time, and potentially more paint later, ensuring a truly professional and long-lasting finish.
Painting Techniques Mastering the Roller and Brush
Now for the fun part: applying the paint! With all that meticulous prep work and priming done, you're ready to see your vision come to life. But even with the best paint, poor technique can ruin the finish. Mastering the roller and brush isn't about being an artist; it's about understanding a few fundamental principles that ensure even coverage, smooth transitions, and no unsightly streaks or drips.
Let's start with your tools. For rollers, choose the right nap size. A 3/8-inch nap is a good all-around choice for smooth to lightly textured walls. For very smooth surfaces, a 1/4-inch nap might be better, and for heavily textured walls, a 1/2-inch or even 3/4-inch nap will hold more paint and get into crevices. Brands like Purdy and Wooster offer excellent roller covers that hold a lot of paint and leave a smooth finish. A good quality roller cover can cost $5-$15, but cheap ones can shed fibers and leave lint on your walls. For brushes, a 2-inch or 2.5-inch angled sash brush is ideal for cutting in (painting edges) and trim work. Look for brushes with synthetic bristles for latex paints, as they hold their shape better. Purdy and Wooster also make fantastic brushes, typically $10-$25 each.
Before you even open the paint can, give it a good stir. Even if it was shaken at the store, pigments can settle. Use a paint stirrer, not a stick from the yard. Pour a manageable amount of paint into a paint tray. Don't overfill it. For rollers, load the roller cover by rolling it back and forth in the paint reservoir until it's evenly saturated, then roll it on the ribbed section of the tray to remove excess paint. You want it loaded, but not dripping.
When rolling, start by painting a 'W' or 'M' pattern on the wall, then fill it in with vertical strokes. Work in sections, typically about 3x3 feet. Overlap each stroke slightly to avoid roller marks. Maintain a wet edge, meaning you should always be rolling into paint that is still wet. This prevents lap marks. Apply light to medium pressure; don't press too hard, as this can squeeze paint out the sides of the roller and create unevenness. For example, a gallon of Behr Premium Plus Interior Paint & Primer costs around $30-$40 and offers good coverage. Sherwin-Williams SuperPaint is another popular choice, often priced higher but known for its durability and finish.
For cutting in, use your angled brush. Dip about one-third of the bristles into the paint. Tap off excess paint gently on the side of the can or tray; don't wipe it on the rim, as this can overload the brush. Hold the brush like a pencil, with a firm but comfortable grip. Use the tip of the angled bristles to create a clean line along the trim or ceiling. Use long, steady strokes. Don't try to paint too far with one load of paint; reload your brush frequently to maintain a consistent line. After cutting in around the edges of a section, immediately roll that section of the wall. This helps blend the brush strokes with the roller texture, minimizing visible differences.
Most rooms will require two coats of paint for optimal coverage and durability, especially if you're changing colors significantly. Allow the first coat to dry completely according to the manufacturer's instructions before applying the second. This is usually 2-4 hours. Applying a second coat too soon can lift the first coat or create a streaky finish. When applying the second coat, follow the same techniques. Remember, patience and consistent technique are key to achieving that smooth, professional finish.
Finishing Touches and Cleanup Ensuring a Lasting Impression
You've done the hard work: prepped, primed, and painted. Now it's time for the final steps that truly elevate your paint job from DIY to professional, and ensure your tools are ready for the next project. These finishing touches and proper cleanup are just as important as the painting itself for a lasting impression and hassle-free future.
First, let's talk about removing painter's tape. This is a critical moment. The general rule of thumb is to remove the tape when the paint is dry to the touch but not fully cured. This usually means within a few hours of applying the final coat. If you wait too long, the paint can fully bond to the tape, and when you pull the tape off, it can peel away chunks of your freshly painted wall. If you remove it too soon, wet paint can smudge. For best results, pull the tape off at a 45-degree angle, slowly and steadily. If you notice any paint bleeding under the tape, you can often carefully scrape it away with a utility knife or a damp cloth while the paint is still slightly pliable. If you used high-quality tape like FrogTape, bleed-through should be minimal.
Once the tape is off, inspect your work. Look for any drips, smudges, or areas that might need a tiny touch-up. Small drips can often be carefully scraped off with a razor blade once completely dry. For minor touch-ups, use a small artist's brush. Be careful not to overdo it; sometimes, a small imperfection is less noticeable than a poorly blended touch-up. Remember, the goal is a smooth, even finish.
Now, for cleanup. This is where many DIYers get lazy, but proper cleanup extends the life of your tools and makes your next project much easier. For latex (water-based) paints, cleaning brushes and rollers is relatively straightforward. Scrape off as much excess paint as possible from your roller cover and brush. Then, rinse them thoroughly under warm running water. You can use a brush comb to help remove paint from the bristles. For rollers, a 5-in-1 tool can help scrape paint off the cover. Continue rinsing until the water runs clear. For brushes, reshape the bristles and hang them to dry, or store them flat. For roller covers, stand them on end or hang them to dry. For example, a good quality Purdy brush can last for years with proper cleaning.
For paint trays, scrape out excess paint and rinse. If you used a tray liner, simply discard the liner. If you have leftover paint, seal the can tightly. You can place a piece of plastic wrap over the opening before putting the lid on to create a better seal. Store paint cans upside down to create an airtight seal and prevent skinning. Label the can with the room it was used in and the date. This is invaluable for future touch-ups.
Finally, replace all switch plates and outlet covers. Move your furniture back into place. Give the room a good vacuum or sweep to pick up any dust or debris. While the paint might be dry to the touch, it takes several days, sometimes even weeks, to fully cure and harden. During this curing period, be gentle with your newly painted walls. Avoid leaning furniture against them or scrubbing them vigorously. With these finishing touches and proper cleanup, your room will not only look professionally painted but will also stand the test of time, and your tools will be ready for your next home improvement adventure.
:max_bytes(150000):strip_icc()/277019-baked-pork-chops-with-cream-of-mushroom-soup-DDMFS-beauty-4x3-BG-7505-5762b731cf30447d9cbbbbbf387beafa.jpg)